|
It’s easy to scare up some fun with Halloween decorations from The Home Depot. Sadie Lish of Clover Lane Blog was able to take advantage of a few products to create a spooky Halloween porch with her kids.
Halloween decor is out in full swing at The Home Depot and MY KIDS ARE HERE FOR IT. Every time we go there in the fall (which is at least three days a week), we have to walk through the Halloween section. Clearly, I needed to take some items home with me to create a spooky space they could admire at home. First things first: Research and DevelopmentThis might be the easiest step to creating the perfect look. For our research and development, we headed down to our local Home Depot. We walked through the Halloween section pushing every button imaginable and made quite a bit of noise. One guy walking by loved it so much that he shouted “BOO” to my nephews. A good time for all! The Home Depot’s Halloween section is organized by theme which makes it easy to shop and envision your space. Here’s my list of items to include in the perfect spooky outdoor space: Pumpkins
Go crazy in the pumpkin section and you are well on your way to having the best porch in your neighborhood. Don’t believe me? Pumpkins were the first thing we added to my porch and my neighbors practically slammed on their brakes to see what we were up to. Mums
I know what you’re thinking, mums aren’t even remotely spooky. They do however make a fabulous space filler on your porch. I highly recommend adding some mums to your list. Putting them in a vintage container will get you extra points too! Tombstones
These Tombstones exceeded all expectations for me! Perfect for the front lawn or flowerbed in front of a porch. Bonus is the cute names on these tombstones like Manny Bones and Bea A. Fraid. Fog Machine
Every spooky space looks better with a fog machine. It’s a proven fact. We chose this fog machine and put it in black cauldron. It paired perfectly with the witch silhouette we made. Which brings me to my next porch addition. Witch Silhouette
Head to the lumber section and get a 2×4 sheet of ¼” MDF. Trace a witch silhouette on it and cut it out with your jig saw. Paint it black and place it strategically in your lawn or leaning up near your tombstones. Add a small outdoor light behind it and place the fog machine near it. One person driving by rolled down their window and yelled “love it”! I’d say that’s a job well done. Faux Spider Webs
Guys, you have got to grab one of these Webcaster Guns. It makes a faux spider web that is so real looking it gives me the chills when I walk through it. Not to mention that it is fun to use. Simply plug it into a power source, hook it up to your air compressor, add a glue stick, and get to work casting spider webs all over everything you own. Salem Broom Company Sign
While you are picking up your sheet of MDF for the witch silhouette, grab a 2’ x 4’ sheet of ¾’ wood for the cutest project. We painted our sign black and used our vinyl cutting machine to make a custom stencil. If you don’t own a vinyl machine you can always freehand a cute saying on it! Frame it out with stained 2×2 pine boards and mount it on your porch. Broom Hook
Cut down a 1×6 pine board to desired size (ours is 4’ long) and stain it with your favorite stain. My favorite is Golden Oak by Varathane. Attach hooks and hang on your porch under your broom company sign. Witches Brooms
Homemade brooms are so easy to make! Use a 1” thick dowel and paint or stain it. Gather some dried sticks from your yard and use a rope to tie the bundle of sticks on the end of the dowel. Drill a hole in the top of your dowel and thread it with a string. Hang it on your broom parking board and step back to admire your hard work!! Neon Witch Sign
Words can’t describe the love we have for this adorable sign! It is cute during the day and perfection lit up at night! It is one of our favorite additions to our spooky porch! Projection Light Show
This last step might be the most important. There are a handful of light show projections to choose from. Ours is the Halloween Super Bright Ghost Flame LightShow Projection with Remote Control and it has 15 different light settings. It’s the best! It even comes with a remote so you can stand their and change the colors as often as you like. These are my key elements to creating the spookiest outdoor space on your block. Here’s to making this the best Halloween yet! The post How to Create a Spooky Halloween Porch appeared first on The Home Depot Blog. How to Create a Spooky Halloween Porch syndicated from https://wallsgshop.blogspot.com/ via Tumblr How to Create a Spooky Halloween Porch
0 Comments
Maintaining a home means you have to tackle a lot of chores, but that to-do list doesn’t have to be intimidating — not when you take it one season at a time!
Today’s Homeowner’s Four Seasons of Home Ownership Guide breaks down home maintenance into spring, summer, fall and winter tasks to make everything manageable. Here’s a look at the top five things you can do this fall. Replace A/C Filters
A lot of people pull sweaters and jackets from storage to prepare for cooler weather, but they forget one important thing: to change their air conditioner filter. A good rule of thumb is to replace your central heating/cooling system’s filter every one to three months. This doesn’t just boost the system’s performance and keep it operating efficiently; it also improves your home’s indoor air quality. Replacing the filter is easy — just open the return cover and remove the old filter. Then replace it with a new filter sized to fit the opening, and make sure the airflow arrow points in toward the ductwork. I always say steer clear of $3 filters available at grocery stores. Those inexpensive fiberglass air filters only capture 10% to 15% of airborne particles. Instead, look for electrostatically charged filters that contain carbon and can remove up to 99% of airborne pollutants. Want to stay on top of things? Write the installation date on the filter’s border and set a reminder on your calendar for the next replacement. Your heating and cooling system will never have an outdated filter again! Then there’s just one final step: Before you close the cover, go ahead and vacuum or wipe off the grill that holds the filter in place. Clean gutters and downspouts
Gutters have an important job: they direct water away from the house to protect your siding, foundation and landscaping. Without them, siding can rot, basements flood, and flower beds erode. Maintaining gutters is one of the most overlooked chores, because you have to climb a ladder and clean them. But it’s also one of the most important things you can do, because clogged or leaking gutters can lead to expensive damage. Installing gutter guards can buy you some time between cleanings, but they’re useless if you don’t check them regularly. That’s because pine straw and leaves can become lodged in them, and smaller debris can pile up and cause big problems down the line. To clean gutters, grab a ladder, a garden trowel, a bucket lined with a trash bag, a hose, a rag and gloves for sharp edges. Serious clogs may require a plumber’s snake. Use the trowel to scoop leaves and debris from the gutter into the bucket. Add the collected material to a compost pile if you have one, or dispose of it with other lawn debris. Once you’ve cleaned the gutters, check the downspouts for clogs. To flush them out, insert a hose with a rag wrapped around it to direct water out of the downspout. Now, wasn’t that simple? Rake Leaves Off The Lawn
It happens every year: fall arrives and sends shade trees’ leaves fluttering to the ground. It’s all part of Mother Nature’s plan because those fallen leaves eventually break down and provide nutrients to the trees. But those leaves also choke out competing plants, and homeowners aren’t wild about crunchy leaves all over their driveways, lawns and gardens. Think you’ll just wait for a storm to blow leaves into a neighbor’s yard? Well, that’s an optimistic — not realistic — way of looking at things. The truth is, raking doesn’t just make your yard look good, it also prevents mold and diseases from developing in the grass if too many leaves accumulate. A dual-tine rake is great for dethatching the yard, and a hand rake is perfect for clearing leaves from garden beds. Want a simple way to move all those leaves? Just rake them onto a tarp and drag the tarp wherever you’re going to dispose of the leaves. Then, grab a snow shovel, scoop up the leaves and load them into a garbage bag. Want to make mulch? Wear your safety glasses, grab your string trimmer and place it in the garbage can to quickly reduce the volume of those leaves. This is perfect whether you’re taking the leaves to the landfill or creating compost! Replace Weatherstripping
Want to save money on your energy bills? Replacing exterior doors’ worn or damaged weatherstripping — giving them an airtight seal — is a surefire way to do it! This job couldn’t be easier because weatherstripping in newer doors fits neatly in a groove within the door casing. There’s no adhesive or mess to worry about — simply pull out the old weatherstripping, then cut a new piece to length and insert it in the groove. Have an older home without a groove in the door casing? No problem! You can retrofit older doors using rolls of self-adhesive foam weatherstripping. Either way, keeping outside air outside allows your air conditioner to work efficiently and effectively. Seal Outside Cracks
Seasonal changes cause your home to expand and contract, and cracks can develop all over the building’s ‘envelope.’ Sealing cracks wherever two surfaces meet is important because it prevents rain and snow from seeping in. You don’t want snow and rain entering your home because it can lead to mold and rot. Sealing your home’s envelope also prevents outside air from creeping in, and that increases your home’s energy efficiency and lowers utility bills. Anyone can purchase a caulk gun and fill in these gaps — and it’s actually pretty fun! Just remember:
If you plan to paint over the caulking, use caulk that is paintable or just purchase caulk in the color that you need. For more fall home maintenance tips, check out the Four Seasons of Home Ownership Summer Checklist https://www.todayshomeowner.com/4seasons/fall. Danny Lipford hosts “Today’s Homeowner,” https://www.todayshomeowner.com, a nationally syndicated television and radio show.The post 5 Home Improvement Chores to Tackle This Fall appeared first on The Home Depot Blog. 5 Home Improvement Chores to Tackle This Fall syndicated from https://wallsgshop.blogspot.com/ via Tumblr 5 Home Improvement Chores to Tackle This Fall
Home trends change, and over time new upgrades are needed to make a home feel new again. See how Corey Decker of Sawdust 2 Stitches was able to take advantage of a few Home Depot products and upgrade her ‘90s style kitchen.
Our Kitchen BeforeWhen we first moved into our current home it needed some serious lovin’. The kitchen had some oddly placed walls, early 90’s golden oak cabinetry, band-aid colored walls, and a lackluster tile that pulled all the…interesting…color choices together. I am not saying it was a horrible kitchen. I am just saying I personally was going to develop an eye twitch if left unaltered. In order to spare my eye spasms, and ultimately save my sanity, the kitchen makeover commenced immediately.
If you have followed along on my site, you have seen the initial process. The walls have since been taken down, the band-aid color abolished and the 90’s oak painted. As a DIY’er I pride myself on doing as much work as I possibly can for as cheap as I can possibly do it. I was able to get a really good handle on the kitchen using a minimal budget and a lot of elbow grease.
However, there was still tweaking to be done. Ultimately, the pricier purchases (i.e.: appliances) would have to wait. I was at a beautiful holding point. So what if all my appliances were mismatched and had been swapped out with Craigslist replacements? I did not want to rush a decision or go and buy whatever happened to be on sale. I wanted to do my homework and have some time to ruminate on all the options. Well, I have been ruminating for over two years now, and I am happy to announce that after 2.5 years, countless hours of online research and plenty of in-store, hands-on inspections, my kitchen is complete! I have found the appliances that this kitchen was missing, and I even dialed in the design style I was trying to find with these LG appliances. I knew that I wanted to add some strategic pops of black and add a few select pieces of natural wood tones to warm up the space. So here was my thought process to executing those ideas. Fridge: LG Electronics, 23 cu. ft. 4-Door French Door Smart Refrigerator with InstaView Door-in-Door in Stainless Steel, Counter DepthI think we can all agree that a fridge has the potential to make or break a space. They are physically LARGE and whether we like it or not, they do play into the design aspect of a kitchen. When I was shopping for a fridge, aesthetics was definitely a part of the search criteria. I have been loving the look of the new dark appliances, but I am planning on being in this home for a very long time and wanted to make a logical, safe decision when it came to expensive purchases. When I add trendy or bold pieces I always opt for inexpensive, easily changeable pieces. It is a lot easier to switch out hand towels than it is to repaint kitchen walls, get what I am saying?
As I started looking for my dream appliances I made a list of all the features I wanted:
I know that “Counter-Depth” may seem like an odd requirement but it is one of those random things that makes me happy. It makes my eye a little twitchy when the fridge protrudes out into the kitchen. While I realize you do loose some cubic ft., I have noticed that when there is food tucked away in the back corners of a standard depth fridge it tends to get forgotten! With the counter depth fridge everything is visible and easy to locate.
While there were a handful of brands that met these requirements, I ultimately fell in love with the LG Electronics 4-Door French Door, French Door, with InstaView Door-in-Door, Wi-Fi Enabled Refrigerator,
This was a thing of beauty! It has all of the above mention requirements, but it also has an “InstaView Door-in-Door”. It is awesome! This allows you to view the inside of the door compartment by simply knocking twice on the panel. We use this handy little compartment to keep all our commonly used items like milk. It allows us access to them but does not let all the cold air out of the larger unit. And, it acts as an energy-saving barrier.
It was love at first site. I had found my fridge and was in love with the sleek design of the LG line so finding accompanying appliances was a breeze. Range: LG Electronics, 6.3 cu. ft. Slide-In Electric Range with ProBake Convection Oven in Stainless SteelRemember how the “counter depth fridge” was an important requirement when selecting a fridge? Well, I had one non-traditional requests in regard to my range, I really wanted something that did not have a large control panel that visually broke up my backsplash. Yes, it might seem like a petty request, but when you compare it to traditional style with the large upright control panel, it is a huge difference.
It was definitely the look that hooked me, but it was the amazing features that sold me. Well let’s be honest, sold my husband. (He is definitely the chef in the family.)
The new LG convection design is inspired by professional-style ranges, instead of heating unevenly from the bottom of the oven, it heats evenly from the back of the oven. This ensures “optimal heat distribution”.
The cooktop also has really impressed me, they have flexible heating elements! What does this mean? Most standard cooktops include two large burners and two small burners. Well on this fancy cooktop with the twist of a dial you can turn the large elements into smaller ones.
Another thing I love is in addition to the standard four burners it has a fifth cooktop heating element that is specifically used as a “warming” unit. One last thing that I LOVE… I am not much of a cook, but I am an obsessive cleaner. This bad boy has a ten minute quick clean setting! That’s right, no more harsh cleaners or smoking out your kitchen for a few hours. After cooking a big meal, just put on the quick cleaner and you are good to go before you have finished eating your entrée. Boo-yah. Dishwasher: LG Electronics, Top Control Tall Tub Smart Dishwasher with 3rd Rack and WiFi Enabled in Stainless Steel with Stainless Steel TubWhen it comes to streamlining appliances, LG pulled out all the stops. Their dishwasher is no exception. Look at how sleek it is.
No buttons for little fingers to absent mindedly press, leaving you wondering why the dishwasher is all the sudden set to a delicate cycle when YOU KNOW you set that bad boy to “hard baked-on lasagna setting”. (No it’s not a technical term, but you know the setting I am talking about.)
All the buttons are displayed across the top ledge of the machine. Simply select your desired setting before closing. Done. Once it is closed little fingers can’t come and magically delay start your cycle when you are expecting company for dinner.
Microwave: LG Electronics, 2.0 cu. ft. Over the Range Microwave in Stainless Steel with Sensor CookLast but certainly not least, the kitchen appliance that I sadly rely on the heaviest. The microwave.
It is a bit horrifying how much I depend on my microwave. And I definitely have full faith in this beauty. Not only does it come equipped with the fancy industry-standard features, but it also goes above and beyond with its capabilities. Naturally, it has the rotating glass turntable, various cooking options, and 10 power levels. But it has raised the bar on industry standards, my friends! The LG Sensor Microwave has built-in sensor cooking that can determine when food is thoroughly cooked and will automatically turn off! What?! But wait there is more! Not only can it cook your food unsupervised, but it can also do this with multiple items simultaneously. Thanks to its bi-level cooking rack. Game changer.
All-in-all these new LG Appliances have simplified our lives and taken our kitchen to the next level. But wait there is more, did you know they are “smart” too? LG has an app that will allow you to access all sorts of goodies on your appliances. The app truly is a huge selling point, it can do anything from monitor your fridge temp to let you know when the dishwasher cycle is complete! It can even run diagnostics on your appliances. How cool!?
With all the smart features and it’s sleek appearance, it enhances the look of this kitchen and makes it a pleasure to work in.
The post Kitchen Makeover with LG Appliances appeared first on The Home Depot Blog. Kitchen Makeover with LG Appliances syndicated from https://wallsgshop.blogspot.com/ via Tumblr Kitchen Makeover with LG Appliances
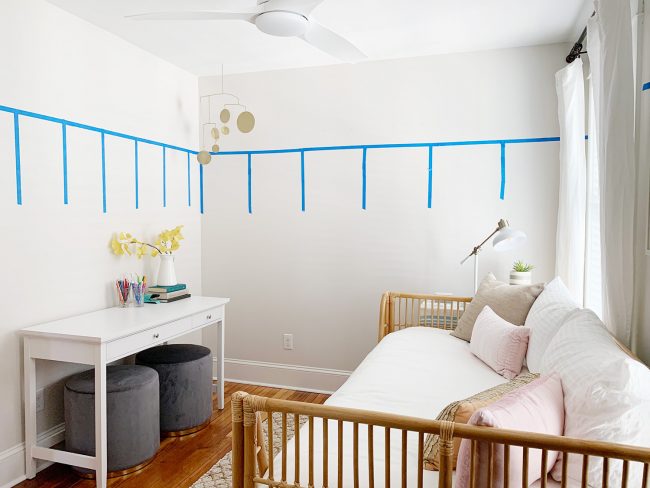
We’re in the midst of two room redos right now and I couldn’t be more excited about them! One is the master bathroom reno that we shared last week, and the other is a much lighter and less dusty one, which involves zero demo or wall moving, but a whole lot of function that we’ll be gaining (plus a wall treatment + wallpaper, which thrills me to no end). We’re “reconfiguring” the middle bedroom at our beach house, which used to look like this. Yes, it’s a very small room that was basically all bed: Having a lighter room redo running in the background while we wait for orders like the master bathroom tub & vanity to arrive and finalize our tile selections is actually really fun. And thankfully we left our bathroom fully functional when we knocked out those walls last week, which means we can still use the space while we wait on that stuff to arrive and get deeper into that project. Continue reading 4 Low-Tech Ways We’re Planning Our Latest Room Makeover at Young House Love.
via Tumblr 4 Low-Tech Ways We’re Planning Our Latest Room Makeover This time of year we take a cue from nature and seek out warmer tones, and for me it’s my collection of amber and tortoise shell blown glass. Amber glass possesses light protection so it makes sense that it’s used for storing beverages like whiskey or ale or liquids and solids for apothecary reasons. Tortoise shell was originally made from the animal itself, but thankfully the trade was banned in the 1970s. In modern times it’s made from a pattern of blown glass and is recognizable from its mottled brown pattern. Wouldn’t you agree there’s no smarter pair of eyeglasses on a handsome lad or lovely lady then tortoise shell spectacles? It’s October, so I was pulling out my collection of amber and tortoise glass as I do every fall season to and scatter them around the house, filling the vases with viburnum clippings and the vessels with vanilla candles. I found some styled images from the past in my archives and they were so pretty I had to share them again!
One place to look for amber glass is at the thrift or antique stores, I’ve picked up several from my collection there. Also eBay and Etsy sellers have some great vintage pieces. And of course at this time of year, you’ll find more for sale in retail stores for obvious reasons, they’re the perfect vessels to mix into your decor to capture the essence of fall!
amber glassware / tortoise shell hurricanes tortoise tray / medicine bottles set / circle and stem vase tumblers set / amber hurricane . Tortoise Shell + Amber Glass syndicated from https://wallsgshop.blogspot.com/ via Tumblr Tortoise Shell + Amber Glass
With Halloween around the corner, it’s the time of year to start thinking about outdoor fall decor. Noelle Bryant of Oh Happy Play was able to take advantage of a few Home Depot products, and creatively design her patio to welcome her guests this holiday season.

When it comes to decorating for the Holidays I get very excited! With our new home I knew I wanted some new family-friendly outdoor Halloween decor so I headed to The Home Depot to get started! I have had a vision for this space in my head for quite some time now so I was excited to get it together. I hope you all enjoy it as much as I do!
Family-Friendly Outdoor Halloween Decor
Last year while trick or treating, we went to a house that had THE GREATEST trio witch decoration out front. I loved it so much that I asked the homeowner where they got it from (after the kids yelled trick or treat of course haha!). I was so happy to see it at The Home Depot this year and it didn’t take me long to snatch one up for myself!
 Home Depot Halloween Decor
I was blown away by the Halloween decor section that Home Depot offers. They had so many fun creatures and yard signs. I wanted to buy them all! Best part was, the prices were incredible too! My girls really enjoyed interacting with the floor displays. It was fun to see all the options and to see what caught their eyes. We ended up needing one of Home Depot’s big carts after we got through!
Below are some of the specifics we LOVED and chose!
Our Outdoor Halloween Decor:
These Spooky Face Jack-O-Lantern pumpkins were only $29! They are the perfect bold statement for any front porch. They are also lightweight for moving and storing. I really haven’t seen anything comparable anywhere else!
You’ve Been BOO’D!
With four young kids, I didn’t want to make my yard too spooky for them. We are outside a lot and I didn’t want to scare them from going out to play. This sign is perfect because it is festive and lights up at night. It is a great size too so it fills up a great portion of space and looks great on its own!
 Indoor Halloween EntranceI didn’t keep it too light though. This brand new to Home Depot 72 inch Witch With Raven is super spooky! The raven’s eyes light up and moves its head when the sensor detects motion. The witch also moves her mouth and to some great phrases and her eyes light up an eerie green. It took my boys a little time to get used to this but now that we have had it at our front entrance they absolutely love getting greeted by it when we walk inside.  Trick Or Treater SafetyMy goal once we get closer to Halloween is to line our walkway with some fun path lights like these Black Grapevine Brooms to go with our witch theme. I think this will offer a great passage for our trick or treaters to safely find their way up to the candy! It is super important to keep this in mind and The Home Depot has some really great options for this!  The post Family Friendly Outdoor Halloween Decor appeared first on The Home Depot Blog. Family Friendly Outdoor Halloween Decor syndicated from https://wallsgshop.blogspot.com/ via Tumblr Family Friendly Outdoor Halloween Decor
People are always asking how we keep our projects and our household organized (“do you make lists? use an app?! help me!”) so today we’re outlining the three tools that we use every day. Some are digital, some are old school, but the most important part is that they help to keep us on the same page (sometimes literally) about our projects, purchases, and more. We’re also sharing the near completion of a long overdue outdoor update that almost sent one of us over the edge… of the roof. Also, could it be true that some people don’t have a de facto “side of the bed” every night? WHAT?! We have questions. You can download this episode from Apple Podcasts, Google Podcasts, Stitcher, TuneIn Radio, and Spotify – or listen to it below! Note: If you’re reading in a feed reader, you may have to click through to the post to see the player. Continue reading #148: How We Keep Our Lives & Projects Organized at Young House Love.
via Tumblr #148: How We Keep Our Lives & Projects Organized Whenever I’m asked about my trip to Porto, I always describe it as the closest thing to walking into a painting. This was the last stop on my adventure through Portugal after visiting the Algarve region, Lisbon and Sintra, and stopping briefly in Aveiro. Porto was magical and I’m so happy I spent my last few days in the country wandering the streets of this picture perfect place. Porto sits on the edge of the Douro River, and boats of all sizes and from all eras pass through the waters creating such an enchanting scene you’re forced to pause every few steps along the riverwalks just to take it all in.
The famous Luís I Bridge dominates the vistas along the Douro River and connects old town Porto with Gaia across the river. It’s easy to walk across the bottom to connect to both riverwalks on each side, or venture up to the top to connect to the higher parts of the city to see the massive views below.
Each side of the river is alive with music and people and cafes, the combination creates an irresistible pulse where you’ll want to spend a lot of time strolling and people watching, especially in good weather. Continue into the town and choose your own adventure. Duck down alleys, turn random corners, and climb twisting staircases, and the city will reveal itself to you.
It would be tragic to visit Porto and not set aside time to taste wine and the specialty ports of the region!
Did you know not only Port wine but the country of Portugal itself were named after the city of Porto? I can see why! I am counting the days until I return. When I do, I plan to spend more time in the Douro Valley, but until then, Porto forever will be one of the most picturesque cities I’ve ever visited.
You see, I told you, it’s just like a painting. Picture Perfect Porto syndicated from https://wallsgshop.blogspot.com/ via Tumblr Picture Perfect Porto
Halloween is around the corner, and families are getting ready to scare up some fun. Jessie Ecker of Eye In The Detail created the ultimate pirate ship in her yard with the help of a few Home Depot products.
This is my first year participating in The Home Depot’s Halloween Style Challenge. When I was invited to partner with The Home Depot for this Challenge, I was beyond excited and a little nervous. This is my first year really decorating for Halloween. The Halloween decor at my house normally consists of white pumpkins. My kids, on the other hand, could not wait to get started. They have begged me to decorate for Halloween for as long as I can remember. So, I was super excited to finally give them the Halloween of their dreams. Designing the SpaceFirst up was designing the space. My theme for the Halloween Style Challenge is pirates. I always start with a focal point when designing any space. This time was no different. I wanted to make something special for this style challenge, so I opted to build a pirate ship as my main focal point. Yes, you heard me correctly, a pirate ship! Once the plans for my ship were drawn out, I chose where I wanted it in my front yard. Next, I decided on what other decorations I would like around it. In my head, I envisioned some kind of dock with water all around it.
Time to go ShoppingThe Home Depot has all sorts of pirate themed decor for Halloween. Because I wanted this to be a fun experience for the whole family, we all went shopping together to pick out our decorations. Of course, I had my design in mind and all drawn out, but my kids had a completely different idea in mind. Isn’t that the way it always works? I’m glad I had a theme because, otherwise, my decorations would be all over the place. The Home Depot has witches, monsters, inflatables, skeletons and so much more. In the end, we chose a pre-lit pirate ship with skeleton, an animated steering wheel and a set of 2 skeleton pirates . None of that comes together without a fog machine, fog Juice and a fog tube. We even went back last minute and picked up a thunder light projector and a few blue flood lights.
Let’s Get BuildingOnce I got started building my pirate ship, I realized I wanted to make something that would last way longer than just the Halloween season. So, I decided to build the pirate ship into an outdoor playground space that I will move to my backyard after the holidays. How you ask? Now, that’s a problem for future me, but at least my kids can enjoy it all year round.
The ship has three sections. There’s a standing space with a pirate flag pole on the front deck. The center of the ship has a section that I will turn into a sand box and a bench for sitting. The back of the deck has stairs leading to it, creating a higher spot for standing. Under that space, I cut out spots for cannons that I built with a black PVC pipe and plumbing pieces. The top space has a ledge for support. It also has a location for the ship’s steering wheel and a spy scope. On the back of the ship, I built a mast using 1′ X 2′ s, old curtains for the cloth and brown twine rope.
SuppliesI used pressure treated deck boards and secured them together using 3 inch deck screws. On occasion, I used my kreg jig for extra support. I also used a miter saw, circular saw, jig saw and clamps. When I was done building, I debated whether or not I should paint the ship or stain it. I ended up staining the whole thing black with Varathrane’s Charred Wood Accelerator. It creates a charred wood look that was perfect for a pirate ship. The whole thing cost under $200. If you are not up to building your own pirate ship, The Home Depot has the most amazing 9.5ft tall pirate ship with a skeleton pirate, animated steering wheel and pirate flag. You can’t beat that! I saw it in the store display it was very impressive. Styling the SpaceMy favorite part of the project was putting everything together and adding the finishing touches. It’s those final details that really make a space incredible. I added blue tarps on the ground the ground to resemble water, and I used old pallets, 2′ X 4’s and brown twine rope to make my dock. The pirate sign was made with leftover wood scraps, stain and white paint. This was such an easy project that really added to the whole scene. Skulls, rats, swords and gold coins scattered into spaces really finished everything off.
Final RevealSo here it is, my Home Depot Halloween Style Challenge in all its glory. I took photos at a few different times of the day so you can see how everything looks during the day and at night. All my little pirates had to join in on all the fun too. Ahoy Matey! All Hands on Deck!!!
Special thanks to The Home Depot for inviting me to participate in the 2019 Halloween Style Challenge. Building, styling and making my kids’ dream Halloween yard was a blast. I put in a lot of hard work, but the end result was absolutely worth it! I am beyond grateful for this incredible opportunity.
Find more Halloween and Harvest decor at the Home Depot. Searching for more inspiration? Check out our other Halloween and Harvest Style Challenge posts here!
The post Ahoy Matey – A Pirate Themed Halloween appeared first on The Home Depot Blog. Ahoy Matey – A Pirate Themed Halloween syndicated from https://wallsgshop.blogspot.com/ via Tumblr Ahoy Matey – A Pirate Themed Halloween
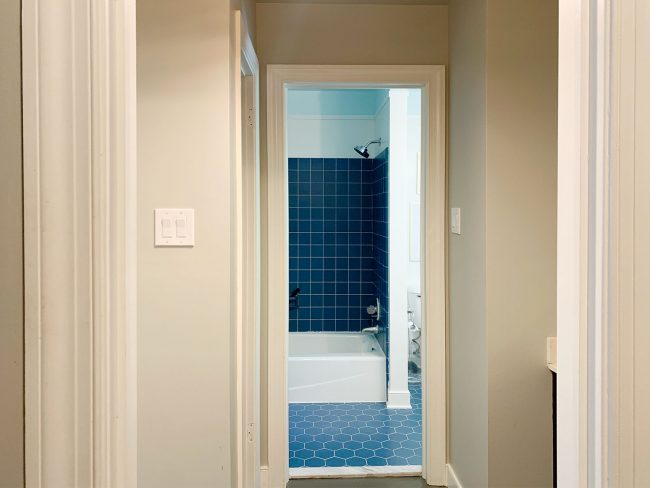
If you listened to this week’s podcast you heard John and I proclaim that we’ve moved from the verrrrry long daydreaming and changing our minds phase of our master bathroom planning process (which lasted over 6 years while we renovated most of the other rooms in our house as well as the entire beach house & duplex) into the finally-being-sure-of-what-we-want-to-get-out-of-it and beginning to actively space-plan it phase. For example, after years of going back and forth about whether we wanted a separate tub and shower or a tub/shower combo, we’re now 100% sold on separate ones (we have that setup at the beach house and it’s our favorite bathroom ever). I even said on this week’s podcast that “I would call what we’re in right now the beginning of the renovation. We are going to gut this room this fall or this winter – like it is upon us.” To that John Not As Impulsive Petersik said: “I don’t think we’re going to be gutting it in the next few days or weeks…” and I made some joke about how he should know me by now and, well, I’ll just leave this picture here. Continue reading Our Long Awaited Master Bathroom Reno Begins at Young House Love.
via Tumblr Our Long Awaited Master Bathroom Reno Begins |
About UsWe provide product review on the home appliances so that people shouldn’t have any difficulty in choosing products. Product review & rating has become a popular feature that most of the successful eCommerce merchants have applied on their product details page. Product reviews are possibly the most valuable information on the Internet. |


 RSS Feed
